Table of Contents
Uploading MARC Records to OCLC
Prepare Records for upload
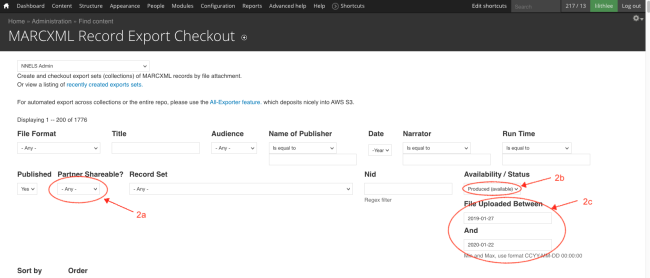
- Go to this MARC record set checkout view https://nnels.ca/admin/content/exporter/recordset_checkout_base
- Keep all default filters as is, and change the following filters to:
- Partner Share = “Any”
- Availability/Status = “Produced”
- Enter the appropriate dates in the "File uploaded between _ and __ fields." For example, if the last record set uploaded to OCLC included records present on Drupal up to January 26, 2019, for the new upload, locate the records uploaded between 2019-01-27 and 2020-01-22 (the date of the export)
- Select all records
- You will see the option to select all the records, not just the ones visible on that page, click that button
- Follow Export MARC records from Drupal instructions from step 6 onwards and the instructions Convert from MARC XML to MRC using MarcEdit on the same page
- Please read the following section to find out how to name the MRC file
Name the MARC File
- The filename contains 3 parts, each separated by a period
.:- a 7-digit data sync
Collection ID - the OCLC institution symbol
CANELfor NNELS, and - optional alphanumeric characters in upper or lower case to identify a particular upload
- For regular upload to update NNELS holdings on OCLC, please use the Collection
Records Added to WorldCat, with the ID1031295 - Add NNELS' OCLC institution symbol
CANELafter theCollection ID: e.g.,1031295.CANEL. - And then add the optional third part to identify the records being uploaded, for example, the date of the last record or record set. In this case, the last record set was exported from Drupal on January 22, 2020. So the filename will be:
1031295.CANEL.20200122.mrc
Upload the MARC File
There are two ways to upload MARC files to OCLC, via WorldShare or via SFTP. WorldShare is more user-friendly. However, when problems occur or when the MARC file is larger than 1GB, please try SFTP.
I. Via WorldShare
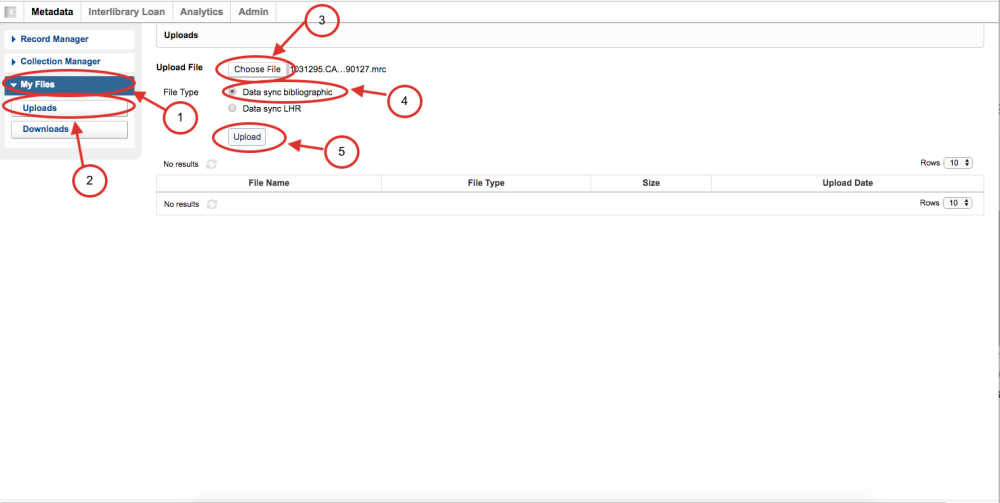
- On OCLC WorldShare, go to
My Files. - Click
Uploads. - Click
Choose Fileto retrieve the MARC file from your computer. - Leave
File TypeasData sync bibliographic.
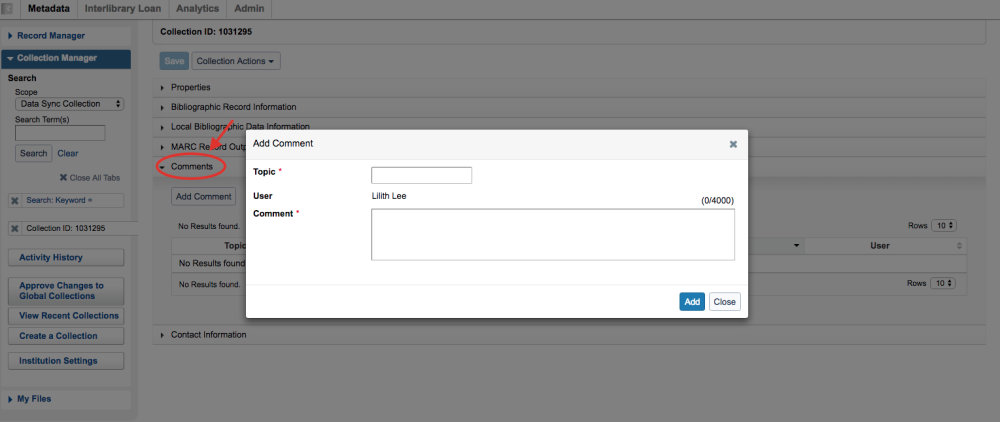
Note that once the file is uploaded it can't be changed. The best way to contact OCLC staff about the upload is through the Collection's comment form. Comments can be added at any time:
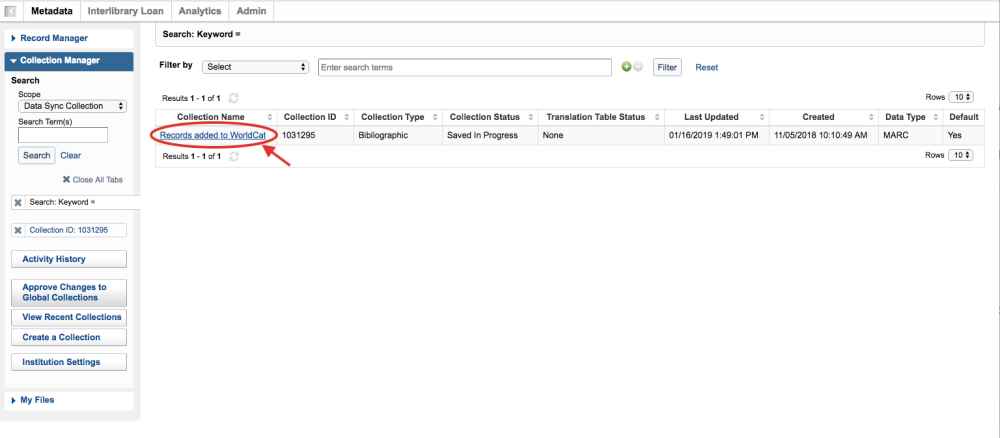
- Go to
Collection Manager. - Choose
Data Sync CollectionunderScope. - Enter the Collection ID under
Search Term(s).
II. Via SFTP
- Download FileZilla (or you can use other SFTP sites)
- Follow OCLC's instructions.
- Information for NNELS: Content Coordinator can provide login
Additional Info
Local System Number (LSN)
Field 001 (which contains the Drupal NID) is used as LSN for OCLC. This field is used by OCLC as the Local System Number (LSN) to produce Unresolved Cross Reference and Bibliographic Cross Reference reports that list each OCLC control number across from the LSN. This information can be used to index the OCLC numbers in our local system. Indexing the OCLC control number links our library's records to other WorldCat services (e.g. WorldCat Discovery).
Check Reports
After the file upload, it will usually take OCLC 48 hours to process it. If the Reports are present, then it means the upload was successful. To check the reports:
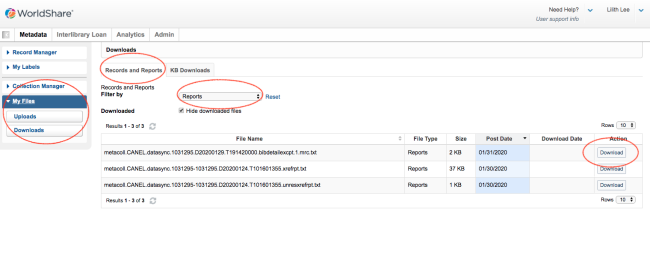
- Log into OCLC WorldShare
- If the file has been processed, you will see the reports available for download
- Download the text files and open them in Excel, consult OCLC Data sync reports and/or My Files reports for instructions on how to read them
- If there are errors listed in one of the reports, read the following section
Edit Uploaded Records in WorldShare
If there are only a few records with error, it is easy to edit them in WorldShare.
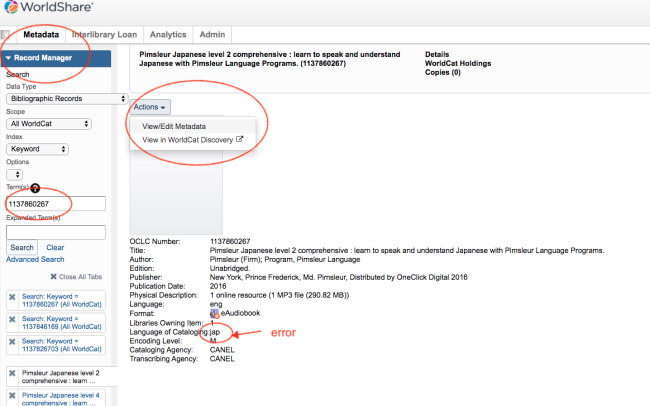
- Note the OCLC call numbers in the report
- Log into OCLC WorldShare
- Once the record is retrieved, click
Actionsand chooseView/Edit Metadata - When you are done, click
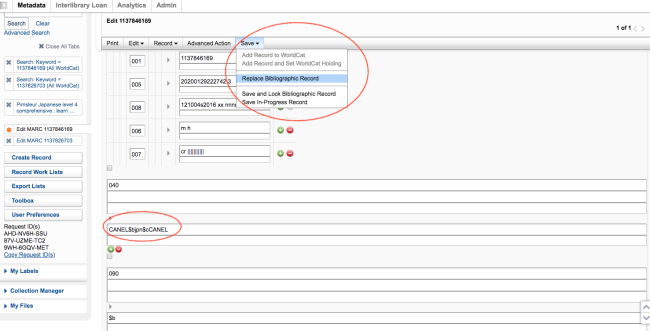
Saveand chooseReplace Bibliographic Records
See this page for instructions on how to fix unresolved records
Go to this OCLC link and scroll to the bottom where it says, "Fix unresolved records through WorldShare Record Manager"
Past Uploads
Please keep a record of each upload. Note the filename for preparing next upload. For example, to prepare for the next upload after the one on September 11, 2020, you should follow the filename and export from Drupal the new records added on/after September 4, 2020.
| Upload Date | No. of records | Filename | Note |
|---|---|---|---|
| 2019-01-27 | 37,926 | 1031295.CANEL.20190127.mrc | |
| 2020-01-24 | 1,776 | 1031295.CANEL.20200222.mrc | error in filename, next export starts from Jan. 22, 2020 |
| 2020-07-24 | 38 | 1031295.CANEL.20200724.mrc | exporter error |
| 2020-09-11 | 2,391 | 1031295.CANEL.20200904.mrc | |
| 2021-03-26 | 4,751 | 1031295.CANEL.20210326.mrc | |
| 2021-08-30 | 8,499 | 1031295.CANEL.20210830.mrc | may be duplicates from 2020-03-26 to 2021-03-26 |
| 2022-03-18 | 2,671 | 1031295.CANEL.20220318.mrc | |
| 2023-02-09 | 6,269 | 1031295.CANEL.20230209.mrc | |
| 2024-11-15 | 6,307 | 1031295.CANEL.20240209.mrc | This upload is records from 2023-02-10 to 2024-02-09 |
| 2024-11-15 | 7,292 | 1031295.CANEL.20241114.mrc | This upload is records from 2024-02-10 to 2024-11-14 |
